Quick Start
React డాక్యుమెంటేషన్కు స్వాగతం! ఈ పేజీ మీరు రోజూ ఉపయోగించే 80% React కాన్సెప్ట్లకు పరిచయాన్ని అందిస్తుంది.
You will learn
- కంపోనెంట్లను ఎలా క్రియేట్ చెయ్యాలి మరియు వాటిని ఎలా నెస్ట్ చెయ్యాలి
- మార్కప్ మరియు స్టైల్స్ ను ఎలా జోడిన్చాలి
- డేటాను ఎలా ప్రదర్శించాలి
- కన్డిషన్లను మరియు లిస్ట్లను ఎలా రెండర్ చెయ్యాలి
- ఈవెంట్లకు ప్రతిస్పందించడం మరియు స్క్రీన్ను ఎలా అప్డేట్ చెయ్యాలి
- కంపోనెంట్ల మధ్య డేటాను ఎలా పన్చాలి
కంపోనెంట్లను సృష్టించడం మరియు వాటిని నెస్ట్ చేయడం
React యాప్స్ అనేవి కంపోనెంట్లు నుండి తయారయినవి. ఒక కంపోనెంట్ అనేది యూజర్ ఇంటర్ఫేస్ (ఊఈ) లో భాగం. దానికన్టూ ఒక స్వంత లాజిక్ మరియు రూపాన్ని కలిగి ఉంటుంది. ఒక కంపోనెంట్ అనేది ఒక బటన్ గా అయినా ఉండవచ్చు, లేదా సంపూర్ణ పేజీ లాగా అయినా ఉండవచ్చు.
React కాంపోనెంట్లు మార్కప్ని return చేసే జావాస్క్రిప్ట్ ఫంక్షన్లు:
function MyButton() {
  return (
    <button>I'm a button</button>
  );
}
ఇప్పుడు మీరు MyButtonని డిక్లేర్ చెసినట్టే, దానిని మరొక కాంపోనెంట్లో నెస్ట్ చెయ్యవచ్చు:
export default function MyApp() {
  return (
    <div>
      <h1>Welcome to my app</h1>
      <MyButton />
    </div>
  );
}
<MyButton /> పెద్ద అక్షరంతో ప్రారంభమవుతుందని గమనించండి. అలా మీరు ఒక React కాంపోనెంట్ ని గుర్తించచ్ఛు. React కాంపోనెంట్ పేర్లు ఎల్లప్పుడూ పెద్ద అక్షరంతో ప్రారంభం కావాలి, అయితే HTML ట్యాగ్లు తప్పనిసరిగా చిన్న అక్షరంతో ఉండాలి.
ఫలితాన్ని చూడండి:
function MyButton() {
  return (
    <button>
      I'm a button
    </button>
  );
}

export default function MyApp() {
  return (
    <div>
      <h1>Welcome to my app</h1>
      <MyButton />
    </div>
  );
}
export default కీవర్డ్లు ఫైల్లో ముఖ్య కంపోనెంట్ ని నిర్దిష్టం చేస్తాయి. మీకు జావాస్క్రిప్ట్ సింటాక్స్లో ఏది అయినా తెలియకపోతే, MDN మరియు javascript.info ని సంప్రదించండి. ఇవి వాడుకరికి మరింత సమాచారాన్ని అందిస్తాయి.
JSX తో మార్కప్ రాయడం
మీరు పైన చూసిన మార్కప్ సింటాక్స్ని JSX అంటారు. ఇది ఐచ్ఛికం, కానీ చాలా React ప్రాజెక్ట్లలో వాటి సౌలభ్యం కోసం JSX ని ఉపయోగిస్తారు. అన్నీ లోకల్ డెవెలొప్మెంట్ కోసం మేము సిఫార్సు చేసే సాధనాలు JSX కి మద్దతు ని ఇస్తాయి.
JSX HTML కంటే స్ట్రిక్ట్ గా ఉంటంది. మీరు <br /> వంటి ట్యాగ్లను మూసివేయాలి. మీ కంపోనెంట్ బహుళ JSX ట్యాగ్లను కూడా అందించలేదు. మీరు వాటిని షేర్డ్ పేరెంట్ లో పెట్టాలి,<div>...</div> లేదా ఖాళీ <>...</> లాంటి ర్యాపర్ లో ర్యాప్ చెయ్యాలి:
function AboutPage() {
  return (
    <>
      <h1>About</h1>
      <p>Hello there.<br />How do you do?</p>
    </>
  );
}ఒకవేళ JSX కి పోర్ట్ చేయడానికి మీ దగ్గర చాలా HTML ఉంటే, మీరు ఆన్లైన్ కన్వర్టర్ ని ఉపయోగించవచ్చు.
స్టైల్స్ జోడించటం
React లో, మీరు className తో CSS class ని పేర్కొంటారు. ఇది HTML class అట్రిబ్యూట్ మాదిరిగానే పని చేస్తుంది:
<img className="avatar" />తరువాత మీరు దాని CSS నియమాలను ప్రత్యేక CSS ఫైల్లో వ్రాస్తారు:
/* In your CSS */
.avatar {
  border-radius: 50%;
}
మీరు CSS ఫైల్లను ఎలా జోడించాలో React సూచించదు. సింపుల్ గా, మీరు మీ HTML కి <link> ట్యాగ్ని జోడిస్తారు. మీరు బిల్డ్ టూల్ లేదా ఫ్రేమ్వర్క్ని ఉపయోగిస్తుంటే, మీ ప్రాజెక్ట్ కి CSS ఫైల్ను ఎలా జోడించాలో తెలుసుకోవడానికి దాని డాక్యుమెంటేషన్ను సంప్రదించండి.
డేటాను ప్రదర్శించటం
JSX జావాస్క్రిప్ట్లో మార్కప్ని ఉంచడానికి మీకు అనుమతిస్తుంది. కర్లీ బ్రేస్లు మిమ్మల్ని జావాస్క్రిప్ట్లోకి “తిరిగి వెళ్ళడానికి” అనుమతిస్తాయి, తద్వారా మీరు మీ కోడ్ నుండి కొంత వేరియబుల్ను పొందుపరచవచ్చు మరియు దానిని వినియోగదారుకు (యూజర్ కు) ప్రదర్శించవచ్చు. ఉదాహరణకు, ఇది user.nameని ప్రదర్శిస్తుంది:
return (
  <h1>
    {user.name}
  </h1>
);
మీరు JSX ఆట్రిబ్యుట్ నుండి “తిరిగి జావాస్క్రిప్ట్లోకి వెళ్ళొచ్చు”, కానీ మీరు కోట్లకు("") బదులుగా కర్లీ బ్రేస్లను() ఉపయోగించాలి. ఉదాహరణకు, className="avatar" అనేది "avatar" స్ట్రింగ్ను CSS class గా పాస్ చేస్తుంది, కానీ src={user.imageUrl} జావాస్క్రిప్ట్ user.imageUrl వేరియబుల్ విలువను చదివి, ఆపై ఆ విలువను src ఆట్రిబ్యుట్ గా పాస్ చేస్తుంది:
return (
  <img
    className="avatar"
    src={user.imageUrl}
  />
);
మీరు JSX కర్లీ బ్రేస్ల లోపల కూడా చాలా క్లిష్టమైన ఎక్స్ప్రెషనులను ఉంచవచ్చు, ఉదాహరణకు, string కంకాటినేషన్:
const user = {
  name: 'Hedy Lamarr',
  imageUrl: 'https://react.dev/images/docs/scientists/yXOvdOSs.jpg',
  imageSize: 90,
};

export default function Profile() {
  return (
    <>
      <h1>{user.name}</h1>
      <img
        className="avatar"
        src={user.imageUrl}
        alt={'Photo of ' + user.name}
        style={{
          width: user.imageSize,
          height: user.imageSize
        }}
      />
    </>
  );
}
పై ఉదాహరణలో, style={{}} అనేది ప్రత్యేక సింటాక్స్ కాదు, కానీ style={ } JSX కర్లీ బ్రేస్ల లోపల సాధారణ {} ఆబ్జెక్ట్. మీ స్టైల్స్ జావాస్క్రిప్ట్ వేరియబుల్స్పై ఆధారపడి ఉన్నప్పుడు మీరు style ఆట్రిబ్యుట్ ని ఉపయోగించవచ్చు.
కన్డీషనల్ రెండరింగ్
React లో,కండిషనులని వ్రాయటానికి ప్రత్యేక సింటాక్స్ లేదు. బదులుగా, మీరు సాధారణ జావాస్క్రిప్ట్ కోడ్ను వ్రాసేటప్పుడు ఉపయోగించే పద్ధతులనే ఉపయోగిస్తారు. ఉదాహరణకు, మీరు కండిషనల్ గా JSX చేర్చడానికి if స్టేట్మెంట్ను ఉపయోగించవచ్చు:
let content;
if (isLoggedIn) {
  content = <AdminPanel />;
} else {
  content = <LoginForm />;
}
return (
  <div>
    {content}
  </div>
);
మీరు మరింత కాంపాక్ట్ కోడ్ని ఇష్టపడితే, మీరు కండిషనల్ ? ఆపరేటర్ ని ఉపయోగించవచ్చు.if వలె కాకుండా , ఇది JSX లోపల పనిచేస్తుంది:
<div>
  {isLoggedIn ? (
    <AdminPanel />
  ) : (
    <LoginForm />
  )}
</div>
మీకు else బ్రాంచ్ అవసరం లేనప్పుడు, మీరు చిన్నదైన లాజికల్ && సింటాక్స్ ని కూడా ఉపయోగించవచ్చు:
<div>
  {isLoggedIn && <AdminPanel />}
</div>
ఈ విధానాలన్నీ కన్డీషన్లతో కూడిన ఆట్రిబ్యుట్లను పేర్కొనడానికి కూడా పని చేస్తాయి. మీకు ఈ జావాస్క్రిప్ట్ సింటాక్స్లో కొన్నింటి గురించి తెలియకుంటే, మీరు ఎప్పుడౖనా if...elseని ఉపయోగించి ప్రారంభించవచ్చు.
లిస్ట్లను రెండర్ చెయ్యటం
కంపోనెంట్ల జాబితా ను మీరు రెండర్ చెయ్యడానికి for లూప్ మరియు అరే(array) map() ఫంక్షన్ వంటి జావాస్క్రిప్ట్ ఫీచర్లపై ఆధారపడతారు.
ఉదాహరణకు, మీ దగ్గర ఒక అరే లో ప్రొడక్ట్స్(array of products) కలిగి ఉన్నాయని అనుకుందాం:
const products = [
  { title: 'Cabbage', id: 1 },
  { title: 'Garlic', id: 2 },
  { title: 'Apple', id: 3 },
];
మీ కాంపోనెంట్ లోపల, అరే ఆఫ్ ప్రొడక్ట్స్ ని అరే ఆఫ్ <li> ఐటెమ్స్ గా మార్చడానికి map() ఫంక్షన్ని ఉపయోగించండి:
const listItems = products.map(product =>
  <li key={product.id}>
    {product.title}
  </li>
);

return (
  <ul>{listItems}</ul>
);
Notice how <li> has a key attribute. For each item in a list, you should pass a string or a number that uniquely identifies that item among its siblings. Usually, a key should be coming from your data, such as a database ID. React uses your keys to know what happened if you later insert, delete, or reorder the items.
const products = [
  { title: 'Cabbage', isFruit: false, id: 1 },
  { title: 'Garlic', isFruit: false, id: 2 },
  { title: 'Apple', isFruit: true, id: 3 },
];

export default function ShoppingList() {
  const listItems = products.map(product =>
    <li
      key={product.id}
      style={{
        color: product.isFruit ? 'magenta' : 'darkgreen'
      }}
    >
      {product.title}
    </li>
  );

  return (
    <ul>{listItems}</ul>
  );
}
Responding to events
You can respond to events by declaring event handler functions inside your components:
function MyButton() {
  function handleClick() {
    alert('You clicked me!');
  }

  return (
    <button onClick={handleClick}>
      Click me
    </button>
  );
}
Notice how onClick={handleClick} has no parentheses at the end! Do not call the event handler function: you only need to pass it down. React will call your event handler when the user clicks the button.
Updating the screen
Often, you’ll want your component to “remember” some information and display it. For example, maybe you want to count the number of times a button is clicked. To do this, add state to your component.
First, import useState from React:
import { useState } from 'react';Now you can declare a state variable inside your component:
function MyButton() {
  const [count, setCount] = useState(0);
  // ...
You’ll get two things from useState: the current state (count), and the function that lets you update it (setCount). You can give them any names, but the convention is to write [something, setSomething].
The first time the button is displayed, count will be 0 because you passed 0 to useState(). When you want to change state, call setCount() and pass the new value to it. Clicking this button will increment the counter:
function MyButton() {
  const [count, setCount] = useState(0);

  function handleClick() {
    setCount(count + 1);
  }

  return (
    <button onClick={handleClick}>
      Clicked {count} times
    </button>
  );
}
React will call your component function again. This time, count will be 1. Then it will be 2. And so on.
If you render the same component multiple times, each will get its own state. Click each button separately:
import { useState } from 'react';

export default function MyApp() {
  return (
    <div>
      <h1>Counters that update separately</h1>
      <MyButton />
      <MyButton />
    </div>
  );
}

function MyButton() {
  const [count, setCount] = useState(0);

  function handleClick() {
    setCount(count + 1);
  }

  return (
    <button onClick={handleClick}>
      Clicked {count} times
    </button>
  );
}
Notice how each button “remembers” its own count state and doesn’t affect other buttons.
Using Hooks
Functions starting with use are called Hooks. useState is a built-in Hook provided by React. You can find other built-in Hooks in the API reference. You can also write your own Hooks by combining the existing ones.
Hooks are more restrictive than other functions. You can only call Hooks at the top of your components (or other Hooks). If you want to use useState in a condition or a loop, extract a new component and put it there.
Sharing data between components
In the previous example, each MyButton had its own independent count, and when each button was clicked, only the count for the button clicked changed:

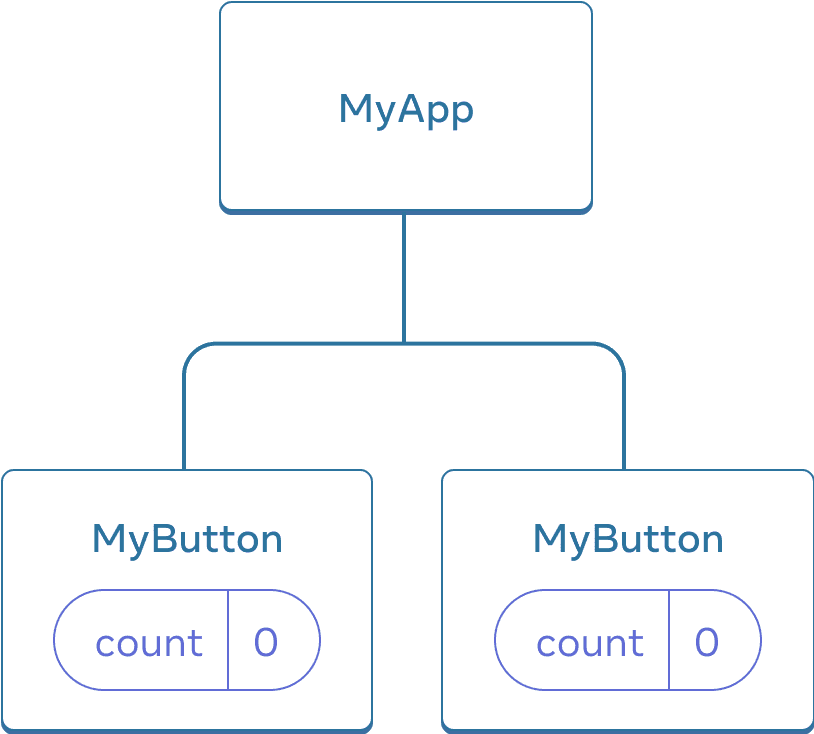
Initially, each MyButton’s count state is 0
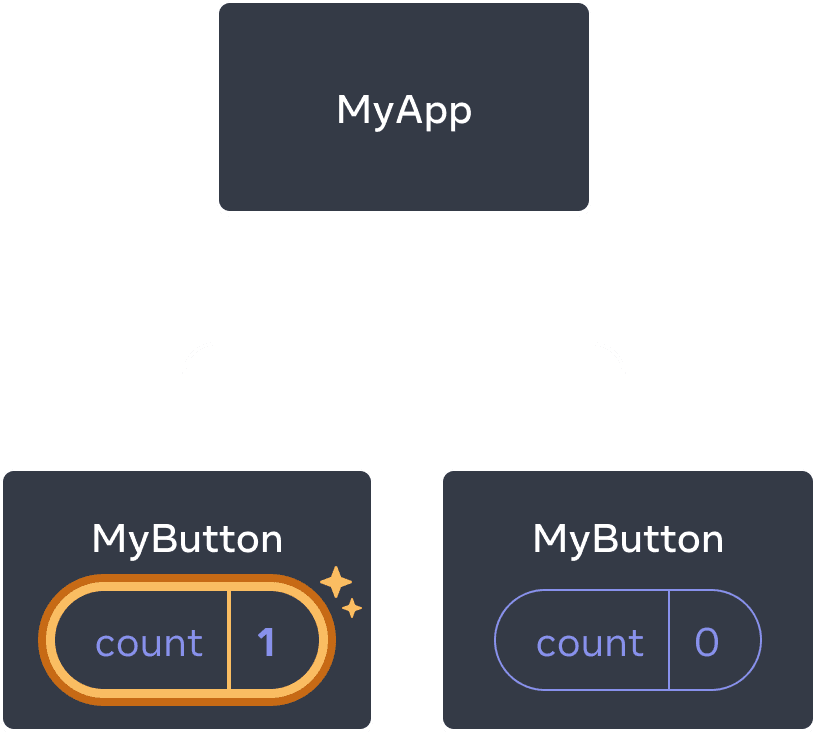

The first MyButton updates its count to 1
However, often you’ll need components to share data and always update together.
To make both MyButton components display the same count and update together, you need to move the state from the individual buttons “upwards” to the closest component containing all of them.
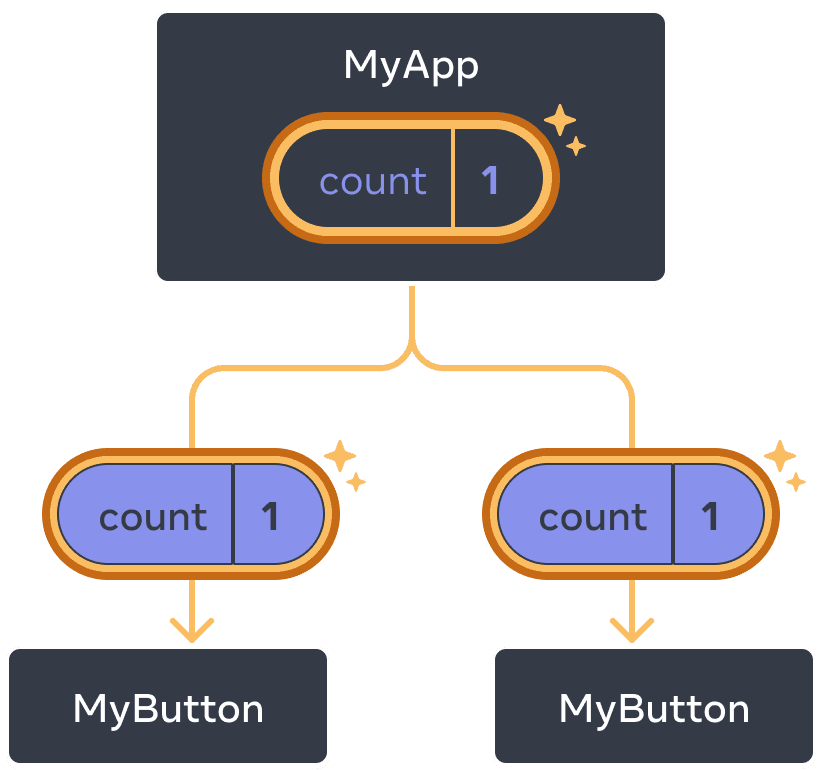
In this example, it is MyApp:
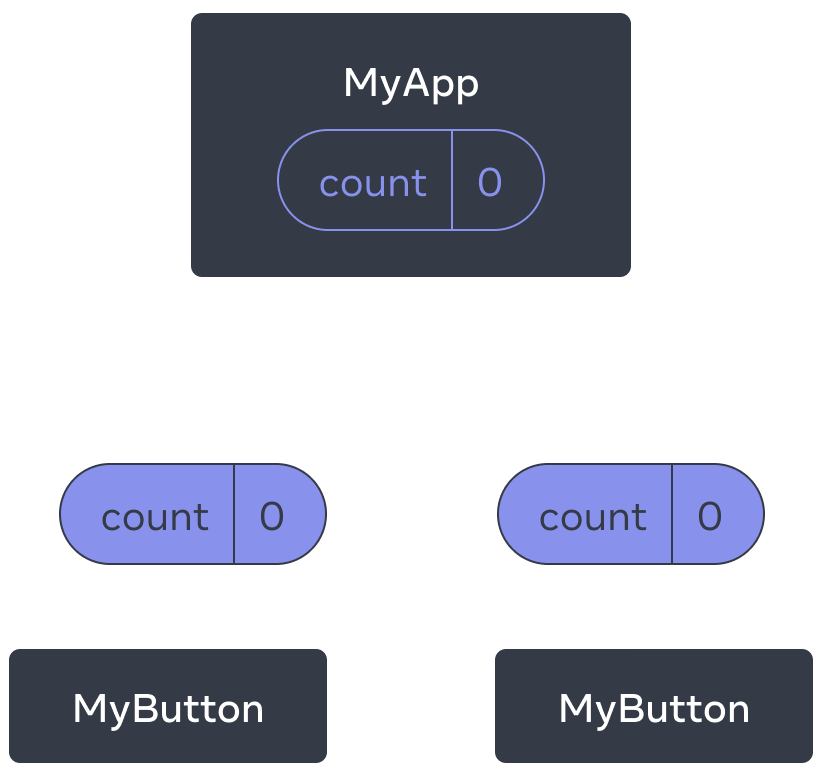
Initially, MyApp’s count state is 0 and is passed down to both children
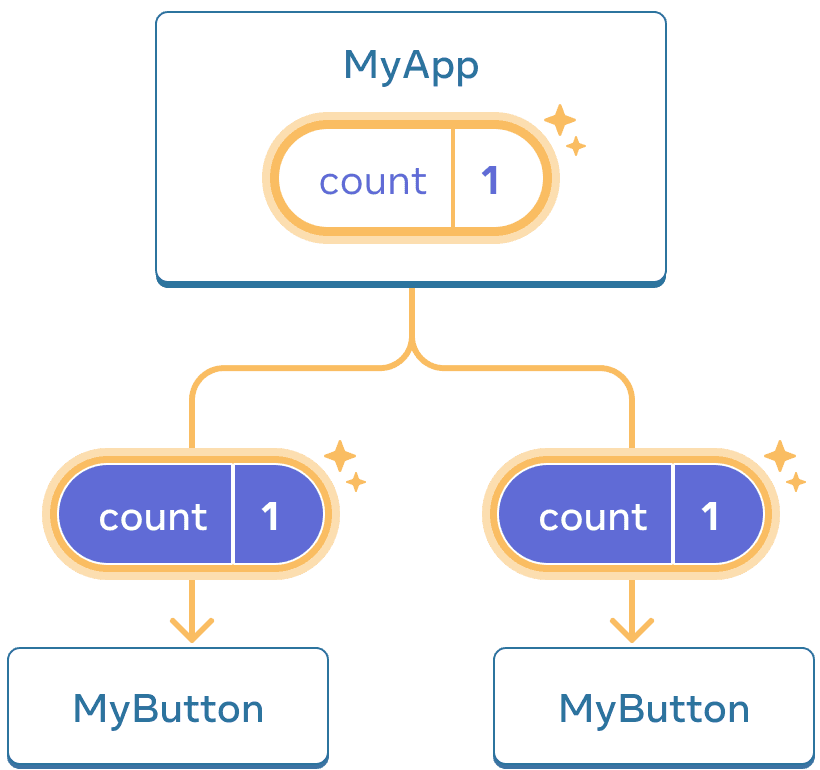
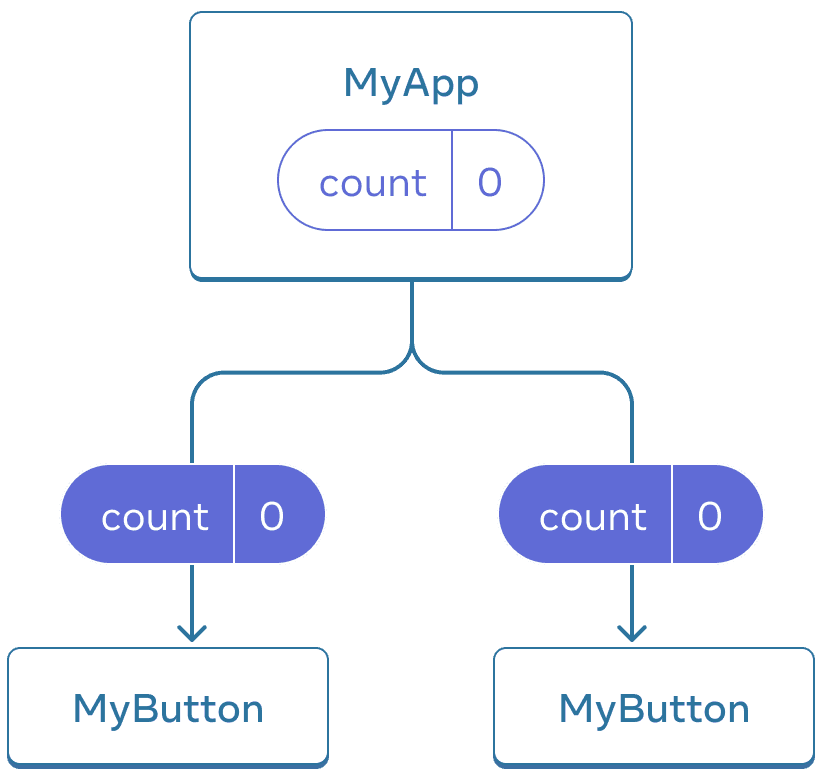
On click, MyApp updates its count state to 1 and passes it down to both children
Now when you click either button, the count in MyApp will change, which will change both of the counts in MyButton. Here’s how you can express this in code.
First, move the state up from MyButton into MyApp:
export default function MyApp() {
  const [count, setCount] = useState(0);

  function handleClick() {
    setCount(count + 1);
  }

  return (
    <div>
      <h1>Counters that update separately</h1>
      <MyButton />
      <MyButton />
    </div>
  );
}

function MyButton() {
  // ... we're moving code from here ...
}
Then, pass the state down from MyApp to each MyButton, together with the shared click handler. You can pass information to MyButton using the JSX curly braces, just like you previously did with built-in tags like <img>:
export default function MyApp() {
  const [count, setCount] = useState(0);

  function handleClick() {
    setCount(count + 1);
  }

  return (
    <div>
      <h1>Counters that update together</h1>
      <MyButton count={count} onClick={handleClick} />
      <MyButton count={count} onClick={handleClick} />
    </div>
  );
}
The information you pass down like this is called props. Now the MyApp component contains the count state and the handleClick event handler, and passes both of them down as props to each of the buttons.
Finally, change MyButton to read the props you have passed from its parent component:
function MyButton({ count, onClick }) {
  return (
    <button onClick={onClick}>
      Clicked {count} times
    </button>
  );
}
When you click the button, the onClick handler fires. Each button’s onClick prop was set to the handleClick function inside MyApp, so the code inside of it runs. That code calls setCount(count + 1), incrementing the count state variable. The new count value is passed as a prop to each button, so they all show the new value. This is called “lifting state up”. By moving state up, you’ve shared it between components.
import { useState } from 'react';

export default function MyApp() {
  const [count, setCount] = useState(0);

  function handleClick() {
    setCount(count + 1);
  }

  return (
    <div>
      <h1>Counters that update together</h1>
      <MyButton count={count} onClick={handleClick} />
      <MyButton count={count} onClick={handleClick} />
    </div>
  );
}

function MyButton({ count, onClick }) {
  return (
    <button onClick={onClick}>
      Clicked {count} times
    </button>
  );
}
Next Steps
By now, you know the basics of how to write React code!
Check out the Tutorial to put them into practice and build your first mini-app with React.